JavaScript
- Linking JavaScript to your HTML
- Working with Elements and attributes
- Working with Events
- Manipulating HTML
- Confirm User Actions
- Form validation
- Summary
Sometimes a quick popup alert or a confirmation dialog is the best solution to displaying a notification or question to a website visitor. Imagine that you have to write a PHP script and a template to confirm deletion of a record – it would be a lot of code. You probably saw a dialog with native look of the operating system on other websites. Such dialog can be displayed using a JavaScript code and it is a built-int part of the browser (frontend).
In this article I will not teach you how to build an application entirely with JavaScript. I will show you how to use very basic functions of this language to overcome the most common problems with the user interface – quickly confirm some action or validate a form before it is send to the backend.
Linking JavaScript to your HTML
Similarly to CSS, a JavaScript file is usually referenced in the <head>
element using a <script> tag (however it may be placed in other parts of the HTML too).
The <script> tag can contain either an URL to download a script or it can directly contain some
JavaScript code:
<!DOCTYPE html>
<html>
<head>
    <meta charset="utf-8" />
    <title>JS example</title>
    <script src="link/to/external/file.js"></script>
    <script>
        console.log("Some message.");
    </script>
</head>
<body>
<p data-personId="34">
<script>
   	console.log("Another message.");
</script>
</body>
</html>
In the above example, the actual JavaScript code is console.log("Some message."); and console.log("Another message.");.
The basic JavaScript syntax is described in a separate article.
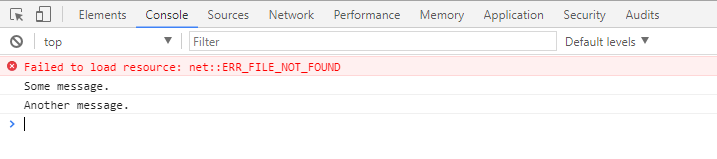
The console is a global object that represents browser’s developer console
(usually activated by F12 key). The log() method puts some output into it. You should have the console activated every time
you develop some JavaScript functionality. Therefore the above code would print two messages in the console.
Working with Elements and attributes
The source code of the linked scripts is executed immediately in the order of the <script> tag appearances. Usually you want
to attach some event handlers — execute a piece of code after a visitor
performs some action (e.g. clicks a button). Event handlers can be attached to general events which take place globally
(like loading the whole page or scrolling the window) or to events that take place on a particular HTML element (clicking on
an element or focusing an element). To attach functionality to an element event, you have to find the element first
and then attach the handler in the JavaScript code.
There are multiple functions for locating HTML elements — the easiest one is
document.getElementById("id_of_element") which can find and return one element using its id
attribute, document is a global object which contains the tree structure of your HTML elements.
Other useful functions to retrieve HTML elements:
document.getElementsByTagName("table")— returns an array of elements with a given tag name (i.e. all<table>elements)document.getElementsByClassName("some-class")— returns an array of elements with a givenclassattributedocument.querySelector(".some-css-selector")— returns the first element matched by a given CSS selectordocument.querySelectorAll(".some-css-selector")— returns an array of elements matched by a given CSS selector
When you have elements, you can access their HTML attributes by their standard names (e.g. console.log(link.href) for
an <a> element). An exception is the class attribute which must be accessed using the element.className property.
To change the CSS styles use the element.style object followed by the camelCase CSS property name (e.g. the
CSS property background-color can be accessed with
element.style.backgroundColor). Another special attribute is innerHTML which can be used to change the content of an
element. You may remember about user defined attributes which can be accessed
in the element.dataset object (e.g. element.dataset.personid for data-personId attribute).
<!DOCTYPE html>
<html>
<head>
    <meta charset="UTF-8">
    <title>Accessing HTML attributes with JavaScript</title>
</head>
<body>
    <a href="http://www.google.com">Google</a>
    <a href="http://www.twitter.com">Twitter</a>
    <script>
        var links = document.getElementsByTagName("a");
        for(var i = 0; i < links.length; i++) {
            links[i].title = links[i].innerHTML;    //copy content to title (displayed when mouse is over element)
            links[i].innerHTML = links[i].href; //copy href to content
            links[i].style.fontSize = "15pt";   //resize
            links[i].style.color = "#FF0000";   //make red
        }
    </script>
</body>
</html>
Although it is possible, you should avoid changing particular CSS styles like in the above example. It is tedious and
makes your code confusing. You should rather add or remove CSS classes (there is a classList
field of the HTML element which allows efficient work with CSS classes).
Working with Events
As described above, various events occur on the web page, either automatically, or through user interaction. To be able to respond to events, you need to register a handler (or subscribe for an event). A handler is a piece of code which handles the event (i.e. does something in response to that event). The event handler is also commonly called a callback (as a piece of code which is “called back” from an event situation).
Basic event registration can be performed in the same manner
as working with standard HTML properties — event
handlers are attributes of the HTML elements. The limitation of this basic approach is that you can attach only one
event handler to each type of event. You can attach multiple events
using the addEventListener('event', handler) method of the element object.
<!DOCTYPE html>
<html>
<head>
    <meta charset="utf-8" />
    <title>JS events example</title>
    <script>
        //wait for the browser to load all HTML
        window.onload = function() {
            //you can attach only one event with this approach
            console.log("Executed when everything is loaded.");
            //find element using id attribute
            var btn = document.getElementById("button1");
            //register event
            btn.onclick = function() {
                btn.innerHTML = "You clicked on it!";
            }
        };
        function callMe() {
            console.log("clicked");
        }
    </script>
</head>
<body>
    <!-- this button has event attached directly in HTML attribute -->
    <button onclick="alert('Hello')">Click it to see alert</button>
    <!-- this button will have an event attached to it programmatically -->
    <button id="button1">Click it to change this text</button>
    <!-- this buttons uses a function declared in JavaScript code -->
    <button onclick="callMe()">Click this to log into console</button>
</body>
</html>
If you are new to Javascript (or any programming) you may be confused by the line window.onload = function() { ... }.
This is indeed something new. The onload property expects to be assigned a handler (which is a piece of code). And
that is exactly what that line does, it assigns a function which has no name and no parameters to the onload property
of window object. A function which has no name is called anonymous function. The same applies to line
<button onclick="callMe()"> where I assigned the code callMe() as the onclick handler body. Identifier callMe
represents a function which I have declared earlier. The brackets are there to actually call that function once the
event occurs and the handler is executed.
It might help you to write <button onclick="callMe();"> where the semicolon emphasizes that the attribute content
is an actual line of JavaScript code. You can even put more function calls or other valid JavaScript expressions into
the attribute body and divide them with semicolons. It is important that the function is called in the handler, i.e. it
is insufficient to write only <button onclick="callMe"> because onclick attribute contains the actual code
of an anonymous function.
Take a look on the line with onclick="alert('Hello')". See how I mixed two kinds of quotes? I used double quotes to
enclose the JavaScript code, which is just a attribute value (a string) from HTML’s point of view. Inside the JavaScript
code I used single quotes to enclose string parameter for the alert(str) function. I cannot use double quotes for both
cases (onclick="alert("Hello")") because HTML parser would stop at the second double quote and thus making the
JavaScript code invalid (alert( only). You can swap the quotes if you want: onclick='alert("Hello")'.
The above is still an example. A cleaner approach is to divide the HTML and the JavaScript code and attach the events
in JavaScript. Also imagine how ugly it looks if you write complex code inside the onclick attribute of an HTML element.
Manipulating HTML
The same way you can manipulate HTML attributes, you can also manipulate with the elements themselves. This means that the HTML code can be changed dynamically when something happens on the page.
Each element can have a set of child nodes, which can be manipulated using appendChild and removeChild methods. For example, you can
remove or add children (elem2) to an HTML element elem with elem1.appendChild(elem2) and elem1.removeChild(elem2).
To create a new element you can use document.createElement method - e.g. var newElem = document.createElement("<p>") to create a new paragraph.
<!DOCTYPE html>
<html>
<head>
    <meta charset="utf-8">
    <title>JS events example</title>
    <script>
        //wait for the browser to load all HTML
        window.onload = function() {
            //create an element and display it
            var newList = document.createElement("ul");
            var cont = document.getElementById("container");
            cont.appendChild(newList);
            //set some content even with HTML tags
            newList.innerHTML = "<li>First list item</li>";
            //create content with code
            var secondListItem = document.createElement("li");
            //set text content - safe from XSS
            secondListItem.textContent = "Second list item <strong>nope</strong>";
            //append item into list
            newList.appendChild(secondListItem);
        };
    </script>
</head>
<body>
<div id="container">
    <!-- nothing here in HTML -->
</div>
</body>
</html>
In the above code, first I create a list ul element (newList variable). Then I pick an existing HTML element (with id container) and
add the list as a child of the container. Then I add two items to the list. Notice the difference between assigning innerHTML and textContent (or innerText) attribute.
The latter is much safer approach, not susceptible to XSS attacks.
All of this is possible thanks to DHTML (dynamic HTML). It is an ability of the web browser that allows it to change actual rendering of a page after HTML structure change made with JavaScript takes place.
Task – Toggle Class Using a Button Click
Make a button and some HTML element with an id attribute. Attach a click event to the button using an onclick attribute.
Toggle CSS class named highlight on the element with the id using the element.classList.toggle('className') method.
You also need to define the CSS class highlight with some visual properties defined (e.g. green border).
<!DOCTYPE html>
<html>
<head>
    <meta charset="UTF-8">
    <title>Event handling with JavaScript</title>
    <style>
        .highlight {
            border: 2px solid #00FF00;
            padding: 5px;
        }
    </style>
</head>
<body>
<button onclick="toggleIt()">
    Click this button to toggle a CSS class.
</button>
<div id="element">
    This is an element.
</div>
<script>
    function toggleIt() {
        var el = document.getElementById("element");
        el.classList.toggle("highlight");
    }
    /* alternative:
    // attach the event programmatically
    var allBtns = document.getElementsByTagName("button");
    // basic event handler attachment
    allBtns[0].onclick = toggleIt;
    // better way of event handler attachment (allows more handlers)
    //allBtns[0].addEventListener('click', toggleIt);
    */
</script>
</body>
</html>
If you came up with another solution, do not worry, there are always multiple working solutions when you write any code.
Confirm User Actions
In the chapter about records deletion, you were referred to this article for
information about how to confirm a user action. Using JavaScript, we can prevent the visitor’s browser from sending
a HTTP request (i.e. following a link or sending a form). This is called preventing navigation and might be useful for
example when the user is filling a form and you want to make sure that she does not accidentally leave the page (and loose the filled form).
Here is an example how to prevent navigation with a confirm popup for basic <a> element:
If you want to prevent navigation on a form, you have to use the onsubmit event:
<!DOCTYPE html>
<html>
<head>
    <meta charset="utf-8">
    <title>Form validation</title>
</head>
<body>
    <form action="http://example.com" method="post" onsubmit="return confirmForm()">
        <input type="submit" value="OK">
    </form>
    <script>
        function confirmForm() {
            //show popup and return true/false
            return confirm('Really submit form?');
        }
    </script>
</body>
You have to pass a true/false value returned by the confirm function from the called confirmForm() function
using the return keyword in the onsubmit attribute. This is because the attribute itself is the body of the event
handler function and has to return true or false to approve or cancel from submission.
Similar confirmation can be created on links:
<!DOCTYPE html>
<html>
<head>
    <meta charset="utf-8">
    <title>Form validation</title>
</head>
<body>
    <a href="http://www.server.org)" onclick='return confirmNav();'>External link</a>
    <script>
        function confirmNav(url) {
            return confirm('Navigate away?');
        }
    </script>
</body>
Again, the handler must return a boolean value from the confirmNav function.
Task – Pass Parameters to the Handler
Let’s create and alert for a form which takes some parameters. I have slightly modified the example above, there
are now two forms, but we would still like to use the same confirmForm function.
<!DOCTYPE html>
<html>
<head>
    <meta charset="utf-8">
    <title>Form validation</title>
</head>
<body>
    <form action="http://example.com" method="post" onsubmit="return confirmForm()">
        <input type="submit" value="Accept">
    </form>
    <form action="http://example.com" method="post" onsubmit="return confirmForm()">
        <input type="submit" value="Deny">
    </form>
    <script>
        function confirmForm() {
            //show popup and return true/false
            return confirm('Do you really want to Accept/Deny?');
        }
    </script>
</body>
Modify the code so that you pass a parameter to the confirmForm, and display appropriate confirmation message.
<!DOCTYPE html>
<html>
<head>
    <meta charset="utf-8">
    <title>Form validation</title>
</head>
<body>
    <form action="http://example.com" method="post" onsubmit="return confirmForm('Accept')">
        <input type="submit" value="Accept">
    </form>
    <form action="http://example.com" method="post" onsubmit="return confirmForm('Deny')">
        <input type="submit" value="Deny">
    </form>
    <script>
        function confirmForm(action) {
            //show popup and return true/false
            return confirm('Do you really want to ' + action + '?');
        }
    </script>
</body>
There are many different solutions. In the solution above, I used the + operator to concatenate strings in
the message and I directly passed the action being confirmed. The + operator in Javascript works both for
adding numbers and concatenating strings.
Task – Confirm Person Deletion
Now enhance the script for deleting persons. Insert a piece of
Javascript code which will prompt the user for confirmation before deleting the person.
Feel free to to insert the JavaScript code directly into the template, but be careful
where you insert the <script> tag – remember that {foreach ...} duplicates all source inside
and you do not want multiple <script> tags with same function declaration in your markup.
Try to pass the person name into the confirmation message.
{extends layout.latte}
{block content}
<table>
    <tr>
        <th>First name</th>
        <th>Last name</th>
        <th>Nickname</th>
        <th>Age</th>
        <th>Delete</th>
    </tr>
    {foreach $persons as $person}
    <tr>
        <td>{$person['first_name']}</td>
        <td>{$person['last_name']}</td>
        <td>{$person['nickname']}</td>
        <td>{$person['age']}</td>
        <td>
            <form action="delete.php" method="post"
                  onsubmit="return confirmDelete('{$person['first_name']} {$person['last_name']}')">
                <input type="hidden" name="id_person" value="{$person['id_person']}">
                <input type="submit" value="Delete">
            </form>
        </td>
    </tr>
    {/foreach}
</table>
<script>
    function confirmDelete(name) {
        return confirm('Really delete ' + name + '?');
    }
</script>
{/block}
Remember that the actions representing modifications of the database records should be transmitted to the server using the POST method.
Form validation
Nowadays you can use much more types of input elements
than a few years ago. This means that many validations can be carried out by the browser.
You can adjust CSS styles using :valid, :invalid or :required pseudo-classes
to visually differentiate input states. You should use these capabilities as much as possible. Nevertheless
you may sometimes need to implement some custom logic. For example switch required state or
enable/disable some input in dependence of another input’s value or dynamically
calculate some additional value such as price.
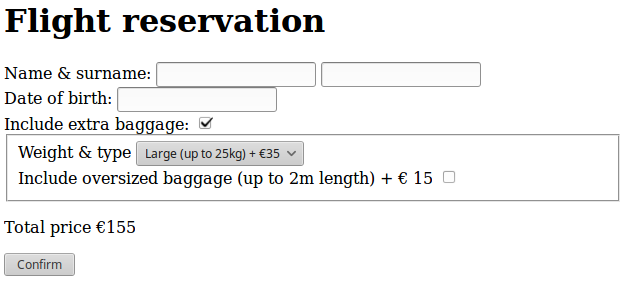
Here is an example with dynamic form which simulates a flight reservation. I used a <fieldset> element
which is capable of disabling or enabling multiple inputs within it. These inputs represent optional
baggage section of a flight reservation form. Based on the selected options, the price of flight is
adjusted immediatelly:
<!DOCTYPE html>
<html>
<head>
<meta charset="utf-8">
<title>Form validation</title>
<script>
window.addEventListener("load", function() {
var flightPrice = 120; //initial price of flight
var baggageElem = document.getElementById("baggage_details");
var totalElem = document.getElementById("total");
var form = document.forms["reservation"];
// calculate price of flight
function updatePrice() {
var price = flightPrice;
//enable additional inputs
var baggageEnabled = form["baggage"].checked
baggageElem.disabled = !baggageEnabled;
if (baggageEnabled) {
switch (form["baggage_type"].value) {
case "1": price += 25; break;
case "2": price += 35; break;
}
price += form["baggage_oversize"].checked ? 15 : 0;
}
totalElem.innerHTML = price;
}
// update price when the user clicks the 'extra baggage' checkbox
form["baggage"].onclick = function() {
updatePrice();
};
// update price when the user clicks the 'oversize baggage' checkbox
form["baggage_oversize"].onclick = function() {
updatePrice();
};
// update price when the user changes the type of baggage
form["baggage_type"].onchange = function() {
updatePrice();
};
// update price right after the page loads
updatePrice();
});
</script>
</head>
<body>
<h1>Flight reservation</h1>
<form name="reservation" method="post">
<label>Name & surname:</label>
<input type="text" name="name" required>
<input type="text" name="surname" required>
<br>
<label>Date of birth:</label>
<input type="date" name="birth" required>
<br>
<label>Include extra baggage:</label>
<input type="checkbox" name="baggage" value="1">
<br>
<fieldset id="baggage_details" disabled>
<label>Weight & type</label>
<select name="baggage_type" required>
<option value="">Select...</option>
<option value="1">Basic (up to 15kg) + €25</option>
<option value="2">Large (up to 25kg) + €35</option>
</select>
<br>
<label>Include oversized baggage (up to 2m length) + € 15</label>
<input type="checkbox" name="baggage_oversize" value="1">
</fieldset>
<p>Total price €<span id="total"></span></p>
<input type="submit" value="Confirm">
</form>
</body>
</html>I used document.forms which contains object with keys defined by the form name attribute.
Each form is again an object with keys defined by inputs’ name attribute. Attributes of
JavaScript objects can be accessed using square brackets (where you can also use a variable)
or you can just use the dot notation .key. There is no functional difference between
document.forms.formName and document["forms"]["formName"]
or document.forms["formName"]. I prefer latter variant because attribute values can
contain characters like - which are reserved in JavaScript and cannot be used in the former variant.
This approach is ideal for manipulating form elements (such as enabling/disabling the fieldset as in the above example). Computing the final price this way is not ideal, because it means duplicated logic in the server and the client scripts (the price computed by the client must be considered unreliable). A better solution in such case is to use AJAX.
Task – Add required attribute to Person & Address form inputs dynamically
Do you remember when I was talking about inserting multiple records at once.
You should have already created a form where you can insert a person and a place where he lives.
Try to extend this form with JavaScript and add required attribute to city only when a user enters a street_name.
<!DOCTYPE html>
<html>
<head>
    <meta charset="UTF-8">
    <title>Event handling with JavaScript</title>
</head>
<body>
    <form name="person-address" method="post">
        <!-- other inputs ... -->
        <label>City</label>
        <input name="city">
        <br>
        <label>Street name</label>
        <input name="street-name">
        <br>
        <input type="submit" value="Insert">
    </form>
    <script>
        //maybe there are more events registered for load event, better use addEventListener
        window.addEventListener("load", function () {
            var streetInput = document.forms["person-address"]["street-name"];
            var cityInput = document.forms["person-address"]["city"];
            streetInput.onchange = function () {
                if (streetInput.value) {
                    //input are mandatory if value of street is set
                    streetInput.required = true;
                    cityInput.required = true;
                } else {
                    streetInput.required = false;
                    cityInput.required = false;
                }
            };
        });
    </script>
</body>
Summary
This brief chapter about JavaScript programming language should help you to improve your project with instant popup dialogs and a bit of client-side form validation. You can find more in articles section of this book.
New Concepts and Terms
- JavaScript
- Event
- Event Handler
- Callback
- Anonymous function
- Dynamic HTML
Control question
- When does JavaScript code get executed?
- How to debug JavaScript?
- Is it safe to execute JavaScript from various sources (e.g. libraries from CDN)?
- Is JavaScript really necessary?