Template layouts
- Getting Started
- Task – Create a template layout
- Task – Modify the layout
- Task – One size does not fit all
- Summary
Templates allow you to create HTML pages with a simplified code and also protect your page against Cross Site Scripting attacks. Apart from that, the template engine allows you to take advantage of Template Page Layouts (or Template Layouts or Page Layouts). Template Layouts are not to be confused with HTML/CSS Page Layouts, which define the visual layout of content in a HTML page. Template Layouts are used to define the HTML code layout across different files, share common parts of the code and reduce repetition. Template Layouts have no effect on the final look of the HTML page. They are merely a programmatic tool used for better HTML code organization.
Each HTML page in a web application shares a lot of the HTML code with other pages in that application. So far you have only created simple isolated pages, so this might not seem obvious at the moment. But if you look at any existing web application you should see that all the pages usually share the same header, footer, navigation, design, etc. Only some part of the page is specific to the page itself. In real world applications, to have high amount of a shared code is a good thing, because it reduces code repetition and leads to consistent feel & look of the application.
Getting Started
The layout template contains all the shared code in the form of a full HTML page with placeholder blocks for the specific page content which is included from the page specific templates.
I have converted the previous Flintstones example to a separate HTML code shared within the application and the HTML code specific to the page:
<?php
$app->get('/flinstones', function (Request $request, Response $response, $args) {
    $tplVars['flintstones'] = [
        'father' => 'Fred',
        'mother' => 'Wilma',
        'child' => 'Pebbles',
    ];
    $tplVars['rubbles'] = [
        'father' => 'Barney',
        'mother' => 'Betty',
        'child' => 'Bamm-Bamm',
    ];
    $tplVars['pageTitle'] = 'The Flintstones';
    $tplVars['showBold'] = true;
    return $this->view->render($response, 'template.latte', $tplVars);
});
And a template file template.latte like this:
{extends 'layout.latte'}

{block body}
	<h2>Flintstones</h2>
	<ul>
	{foreach $flintstones as $role => $name}
		<li>{$role|capitalize} is <strong n:tag-if="$showBold">{$name}</strong></li>
	{/foreach}
	</ul>
	<h2>Rubbles</h2>
	<ul>
	{foreach $rubbles as $role => $name}
		<li>{$role|capitalize} is <strong n:tag-if="$showBold">{$name}</strong></li>
	{/foreach}
	</ul>
{/block}
And a template file layout.latte like this:
<!DOCTYPE html>
<html>
    <head>
        <meta charset="utf-8">
        <title>{$pageTitle}</title>
    </head>
    <body>
        <h1>{$pageTitle}</h1>
		<hr>
		{include body}
	</body>
</html>
Now the template starts with the line {extends 'layout.latte'}, which tells the
template engine to start processing from the layout template layout.latte. This
template contains the usual HTML header and {include body}. This defines
a block named body. It’s the responsibility of the template template.latte to
fill the block with some meaning. In template.latte, you can see that the actual HTML
code is wrapped inside {block body}{/block} macro. This defines the actual content
of the block body (the block is the page specific content).
The extends macro tells the template engine, that the page template inherits its content
from the layout template. The inheritance relation can span multiple levels. You can create a
page which inherits from a template which inherits from another template.
The layout template can define many different blocks, all of which must be filled inside the page template:
<?php
$app->get('/flinstones', function (Request $request, Response $response, $args) {
    $tplVars['flintstones'] = [
        'father' => 'Fred',
        'mother' => 'Wilma',
        'child' => 'Pebbles',
    ];
    $tplVars['rubbles'] = [
        'father' => 'Barney',
        'mother' => 'Betty',
        'child' => 'Bamm-Bamm',
    ];
    $tplVars['pageTitle'] = 'The Flintstones';
    $tplVars['showBold'] = true;
    return $this->view->render($response, 'template.latte', $tplVars);
});
And a template file template.latte like this:
{extends 'layout-4.latte'}

{block title}{$pageTitle}{/block}

{block body}
	<h2>Flintstones</h2>
	<ul>
	{foreach $flintstones as $role => $name}
		<li>{$role|capitalize} is <strong n:tag-if="$showBold">{$name}</strong></li>
	{/foreach}
	</ul>
	<h2>Rubbles</h2>
	<ul>
	{foreach $rubbles as $role => $name}
		<li>{$role|capitalize} is <strong n:tag-if="$showBold">{$name}</strong></li>
	{/foreach}
	</ul>
{/block}
And a template file layout.latte like this:
<!DOCTYPE html>
<html>
	<head>
		<meta charset="utf-8">
		<title>{include title}</title>
	</head>
	<body>
		<h1>{include title}</h1>
		<hr>
		{include body}
	</body>
</html>
From the above examples, you can see that they do not affect the PHP code at all (except for the page title
variable). Template layouts are only a way of organizing the HTML code in the
template files. Also notice that the variables passed to the templates in the render function are
usable in both template files (e.g. see pageTitle variable).
The hr (Horizontal Ruler) HTML element produces horizontal separator. It has a
unpaired tag.
Task – Create a template layout
Take the two application parts – the person form and the contact from you have created in the previous chapters, and create a template layout for them.
Hint: You will need three template files – a template for the contact form; a template for the person form; and a layout template
Person form script:
<?php
$app->get('/person-form', function(Request $request, Response $response, $args) {
    // Existing user
    $person = [
        'id' => 123,
        'first_name' => 'John',
        'last_name' => 'Doe',
        'nickname' => 'johnd',
        'birth_day' => '1996-01-23',
        'height' => 173,
    ];
    /*
    // New user
    $person = [
        'id' => null
        'first_name' => '',
        'last_name' => '',
        'nickname' => '',
        'birth_day' => null,
        'height' => null,
    ];
    */
    if ($person['id']) {
        $tplVars['pageTitle'] = "Edit person";
    } else {
        $tplVars['pageTitle'] = "Add new person";
    }
    $tplVars['person'] = $person;

    $this->view->render($response, 'person-form.latte', $tplVars);
});
Person form template:
{extends 'layout.latte'}

{block title}{$pageTitle}{/block}

{block body}
    {if $person['id']}
        <h2>Update person {$person['first_name']} {$person['last_name']}</h2>
    {else}
        <h2>Create a new person</h2>
    {/if}
    <form method="post" action="http://odinuv.cz/form_test.php">
    	<ul>
    		<li>
    			<label>First name:
    				<input type="text" name="first_name" value="{$person['first_name']}">
    			</label>
    		</li>
            <li>
                <label>Last name:
                    <input type="text" name="last_name" value="{$person['last_name']}">
                </label>
            </li>
            <li>
                <label>Nickname:
                    <input type="text" name="nickname" value="{$person['nickname']}">
                </label>
            </li>
            <li>
                <label>Date of Birth:
                    <input type="date" name="birth_day" value="{$person['birth_day']}">
                </label>
            </li>
    		<li><label>Height:
                    <input type="number" name="height" value="{$person['height']}">
                </label>
    		</li>
    	</ul>
        {if $person['id']}
            <button type="submit" name="submit" value="update">Update</button>
        {else}
            <button type="submit" name="submit" value="create">Create new</button>
        {/if}
    </form>
{/block}
Contact form script:
<?php
$app->get('/contact-form', function (Request $request, Response $response, $args) {
    $currentUser = [
        'first_name' => 'John',
        'last_name' => 'Doe',
        'email' => 'john.doe@example.com',
        'birth_year' => 1996,
    ];
    /*
    // Not Logged User
    $currentUser = [
        'first_name' => '',
        'last_name' => '',
        'email' => '',
        'birth_year' => '',
    ];
    */
    if ($currentUser['first_name']) {
        $tplVars['message'] = "Hello,\nI'd like to know more about your product <ProductName>\n\nBest Regards,\n" .
            $currentUser['first_name'] . ' ' . $currentUser['lastName'];
    } else {
        $tplVars['message'] = "Hello,\nI'd like to know more about your product <ProductName>\n\nBest Regards,\n<YourName>";
    }

    $tplVars['rows'] = 10;
    $tplVars['cols'] = 50;
    $tplVars['pageTitle'] = "Contact form";
    $tplVars['currentUser'] = $currentUser;
    $tplVars['years'] = [];
    for ($year = 1916; $year < date('Y'); $year++) {
        $tplVars['years'][] = $year;
    }

    $this->view->render($response, 'contact-form.latte', $tplVars);
});
Contact form template:
{extends 'layout.latte'}

{block title}{$pageTitle}{/block}

{block body}
    <h2 n:if="$currentUser['first_name']">Hello {$currentUser['first_name']} {$currentUser['last_name']}</h2>
	<form method="post" action="http://odinuv.cz/form_test.php">
		<ul>
			<li>
				<label>First name:
					<input type="text" name="first_name" value="{$currentUser['first_name']}">
				</label>
			</li>
            <li>
                <label>Last name:
                    <input type="text" name="last_name" value="{$currentUser['last_name']}">
                </label>
            </li>
            <li>
                <label>E-mail address:
                    <input type="email" name="email" value="{$currentUser['email']}">
                </label>
            </li>
            <li>
                <label>Year of birth:
                    <select name="birth_year">
                    {foreach $years as $year}
                        <option n:attr="selected => $currentUser['birth_year'] == $year" value="{$year}">{$year}</option>
                    {/foreach}
                    </select>
                </label>
            </li>
			<li>
				<label>Message for us:
					<textarea name="message" cols="{$cols}" rows="{$rows}">{$message}</textarea>
				</label>
			</li>
		</ul>
		<button type="submit" name="contact" value="contact">Contact Us</button>
	</form>
{/block}
Layout template:
<!DOCTYPE html>
<html>
	<head>
		<meta charset="utf-8">
		<title>{include title}</title>
	</head>
	<body>
		{include body}
	</body>
</html>
Task – Modify the layout
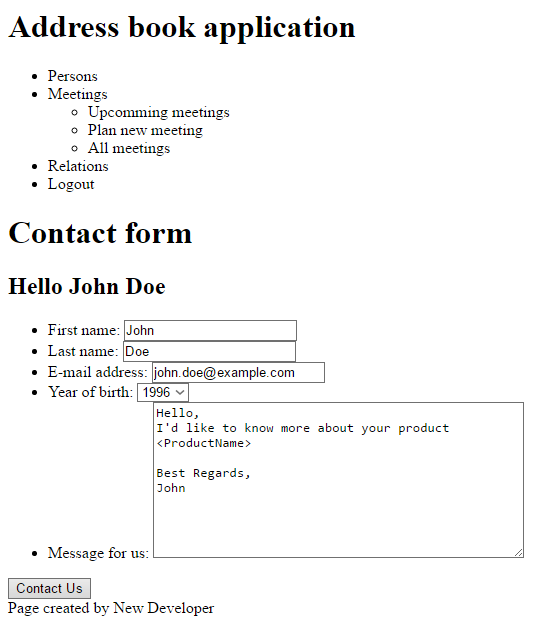
Now modify the layout to add an application menu, footer and header to make the page look similar to this:
<!DOCTYPE html>
<html>
	<head>
		<meta charset="utf-8">
		<title>{include title}</title>
	</head>
	<body>
        <h1>Address book application</h1>
        <nav>
            <ul>
                <li>Persons</li>
                <li>Meetings
                    <ul>
                        <li>Upcomming meetings</li>
                        <li>Plan new meeting</li>
                        <li>All meetings</li>
                    </ul>
                </li>
                <li>Relations</li>
                <li>Logout</li>
            </ul>
        </nav>
		{include body}
		<footer>Page created by New Developer</footer>
	</body>
</html>
Notice that now there is a single point where you have modified the HTML content, and both application pages (contact form and person form) have been changed. This approach saves you hours of time during application development.
Task – One size does not fit all
What if you need a page that does need a different look and feel? A typical example is a login form, which usually looks substantially different than the rest of the application. Create a login form which looks like this:
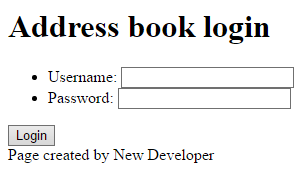
Hint: Simply create another layout template.
Login form script:
<?php
$app->get('/login', function(Request $request, Response $response, $args) {
    $this->view->render($response, 'login-form.latte');
});
Login form template:
{extends 'login-layout.latte'}

{block body}
	<form method="post" action="http://odinuv.cz/form_test.php">
		<ul>
			<li>
				<label>Username:
					<input type="text" name="username">
				</label>
			</li>
            <li>
                <label>Password:
                    <input type="password" name="password">
                </label>
            </li>
		</ul>
		<button type="submit" name="login" value="login">Login</button>
	</form>
{/block}
Login layout template:
<!DOCTYPE html>
<html>
	<head>
		<meta charset="utf-8">
		<title>Address book login</title>
	</head>
	<body>
        <h1>Address book login</h1>
		{include body}
		<footer>Page created by New Developer</footer>
	</body>
</html>
If you are concerned that the footer is not shared between both layouts, you can create
a more complicated structure of a parent layout and child layouts (again by using extends and
include). Personally I would say that at this moment it is not necessary and does not have
much advantage. On the other hand – you might ask, what is the point of creating a
login-layout.latte if there is only one page using it. That is correct and using a simple template
without layout would be also an acceptable solution. I’m counting on making a logout page
in the future, which will use the login-layout.latte.
Summary
In this chapter, you have learned how to use layout templates. Layout templates provide a way to a better organized shared HTML code between various pages of your web application. By reducing repetition, they save you time, reduce number of errors and lead to a consistent page look & feel.
On the other hand, you have probably noticed that now your application contains much more files (and it may be difficult to be oriented in them) and that the pages are not any more self-contained – i.e. they become only snippets of the HTML code. This requires a bit of training and getting used to, because now the application code is slightly more abstract than it was at the beginning.
For small application the overhead of repeated code might be smaller than the overhead of well structured code. As your application grows the overhead of repeated code would increase but the overhead of structured code remains constant.
Now you should be familiar with the reasons for using layout templates. You should be able to create and use a simple page layout with multiple blocks. You should be familiar with the concept of inheritance.
New Concepts and Terms
- Layout Template
- Block
- Inheritance
Control question
- Why use layout?
- Is it OK to have more than one layout?
- Is it possible to have deeper layout nesting?
- How many
{block}statements can you use in one layout?