Using select element
This small chapter is about using HTML select element. This element has three faces in HTML. You often encounter it as simple drop-down list and less often as select list and rarely as select list with multiple options:
Select element is used often to pick values of entity in many-to-one relation to entity of record which is being edited (e.g. person’s address, type of contact, type of relationship, …).
Here is a list of possible select element variants:
| Classic select - drop down |
|
|
|---|---|---|
| Select list |
|
|
| Select list – multiple |
|
The concept behind this type of form input is that you select one (or more) options and their value attribute is
transmitted to server’s backend named according to value of name attribute attached to parent select. If the
option element lacks value attribute, the browser simply sends its contents (visible text).
That hidden value is very important because you can have different representation of entry for the user (e.g. textual)
and for your code (e.g. ID of some database entry).
Groups of radio buttons and checkboxes
work similarly, except that you have to give each of them same name attribute and textual representation is
carried out by label element.
See those squared brackets in third example? They tell the backend to interpret incoming data as array (you can even specify keys for that array in template’s code). Always pass values from multiple selects/checkboxes as array. You can read more about this approach in another walkthrough article.
Radio buttons are like drop-down lists, they allow only one checked value – no need for squared brackets.
Task – use select element to update or erase person’s address.
Step 1
Load all locations from database into select element options and use the value attribute for id_location.
person-address-1.php:
<?php
require 'include/start.php';
try {
    //retrieve all locations
    $stmt = $db->query("SELECT id_location, city, street_name, street_number
                        FROM location
                        ORDER BY city");
    $tplVars['locations'] = $stmt->fetchAll();
    $latte->render('templates/person-address-1.latte', $tplVars);
} catch (PDOException $e) {
    die($e->getMessage());
}person-address-1.latte:
{extends layout.latte}

{block content}
<form method="post">
    <select name="location_id">
        {* use foreach to generate option list *}
        {foreach $locations as $loc}
        <option value="{$loc['id_location']}">
            {$loc['city']} {$loc['street_name']} {$loc['street_number']}
        </option>
        {/foreach}
    </select>
    <button type="submit">Set</button>
</form>
{/block}
Step 2
Now prepare your script to receive id parameter which will represent ID of a person. Find one person in
database and print his name. Remember to pass ID of person along with new ID of his new address – you will need both
in UPDATE query.
person-address-2.php:
<?php
require 'include/start.php';
if(!empty($_GET['id'])) {
    try {
        //retrieve the person by his id
        $stmt = $db->prepare("SELECT * FROM person WHERE id_person = :id");
        $stmt->bindValue(":id", $_GET['id']);
        $stmt->execute();
        $person = $stmt->fetch();
        if($person) {   //was person found?
            $stmt = $db->query("SELECT id_location, city, street_name, street_number
                                FROM location
                                ORDER BY city");
            $tplVars['locations'] = $stmt->fetchAll();
            $tplVars['person'] = $person;
            $latte->render('templates/person-address-2.latte', $tplVars);
        } else {
            die('No person found');
        }
    } catch (PDOException $e) {
        die($e->getMessage());
    }
} else {
    die('No ID');
}person-address-2.latte:
{extends layout.latte}

{block content}
<form method="post">
    {* pass person's ID along for future UPDATE query *}
    <input type="hidden" name="id" value="{$person['id_person']}"/>
    {* print person name *}
    <label>
        Select new address for person {$person['first_name']} {$person['last_name']}:
    </label>
    <select name="location_id">
        {* add blank option *}
        <option value="">Unknown address</option>
        {foreach $locations as $loc}
        <option value="{$loc['id_location']}">
            {$loc['city']} {$loc['street_name']} {$loc['street_number']}
        </option>
        {/foreach}
    </select>
    <button type="submit">Set</button>
</form>
{/block}
To test your page, find some person in a database and type URL like person-address-2.php?id=XXX
into browser’s address bar. Or you can prepare a link to this form from list of persons.
Step 3
Almost there – preselect address of a person if he has one and tell the form where to send data:
person-address-3.php (no change here):
<?php
require 'include/start.php';
if(!empty($_GET['id'])) {
    try {
        $stmt = $db->prepare("SELECT * FROM person WHERE id_person = :id");
        $stmt->bindValue(":id", $_GET['id']);
        $stmt->execute();
        $person = $stmt->fetch();
        if($person) {
            $stmt = $db->query("SELECT id_location, city, street_name, street_number
                                FROM location
                                ORDER BY city");
            $tplVars['locations'] = $stmt->fetchAll();
            $tplVars['person'] = $person;
            $latte->render('templates/person-address-3.latte', $tplVars);
        } else {
            die('No person found');
        }
    } catch (PDOException $e) {
        die($e->getMessage());
    }
} else {
    die('No ID');
}person-address-3.latte:
{extends layout.latte}

{block content}
<form method="post" action="store-address.php">
    <input type="hidden" name="id" value="{$person['id_person']}"/>
    <label>
        Select new address for person {$person['first_name']} {$person['last_name']}:
    </label>
    <select name="location_id">
        <option value="">Unknown address</option>
        {foreach $locations as $loc}
        {* preselect person's address *}
        <option value="{$loc['id_location']}"{if $person['id_location'] == $loc['id_location']} selected{/if}>
            {$loc['city']} {$loc['street_name']} {$loc['street_number']}
        </option>
        {/foreach}
    </select>
    <button type="submit">Set</button>
</form>
{/block}
You can also use Latte’s n:attr macro.
<option value="..." n:attr="selected => $person['id_location'] == $loc['id_location']">
  ...
</option>
Step 4
Now create the update script which will handle form submission – it will receive ID of person and ID of his new address (or empty string if you choose Unknown address option). Redirect back to person address selection form after update:
store-address.php:
<?php
require 'include/start.php';
if(!empty($_POST['id'])) {
    try {
        $lid = !empty($_POST['location_id']) ? $_POST['location_id'] : null;
        $stmt = $db->prepare("UPDATE person SET id_location = :lid WHERE id_person = :id");
        $stmt->bindValue(":id", $_POST['id']);
        $stmt->bindValue(":lid", $lid);
        $stmt->execute();
        //redirect back to address selection page
        header('Location: person-address-3.php?id=' . $_POST['id']);
    } catch (PDOException $e) {
        die($e->getMessage());
    }
} else {
    die('No ID');
}
Notice that I used a different way to pass ID of person to the script in hidden form field. This means, that the
ID of a person is not visible in URL after form submit and you can find it in POST data using getParsedBody()
method. Other way is to append the ID to action attribute of the form as in previous article about
person update.
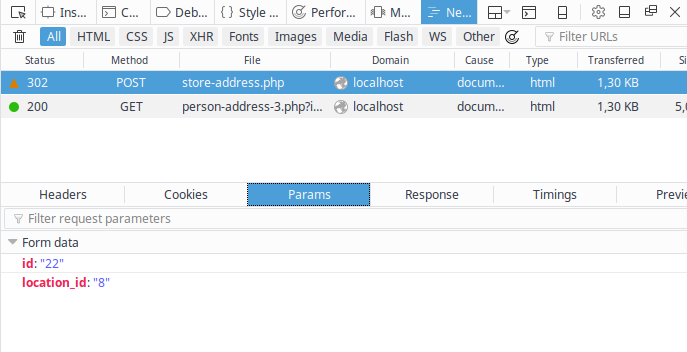
Finally done. Take a look into your browser’s developer tools (F12) and observe what the browser sends when you select different location IDs. Also note HTTP methods and immediate redirection after update script:
Because this is quite small piece of functionality, try to incorporate this script into person update module.
Optgroups
Just to be complete: to group select element options use optgroup tag:
<select name="spoken_languages">
    <optgroup label="Slavic">
        <option value="cze">Czech</option>
        <option value="svk">Slovak</option>
    </optgroup>
    <optgroup label="Germanic">
        <option value="eng">English</option>
        <option value="ger">German</option>
    </optgroup>
</select>
Summary
This walkthrough chapter should help you to understand name-value concept of select element which is not that clear
at first sight as with simple text inputs. You can try to use multiple select element and update some M:N cardinality
relationship like persons attending a meeting. This leads to passing arrays chapter.
New Concepts and Terms
- optgroup
Control question
- Is a multi-select any different to multiple checkboxes?