CSS - Cascading Style Sheets
You already know how to write a HTML page and also how to use the Latte templating system. Still you do not know, how to make your page not to look like it came from 1995. The answer is CSS – a special syntax (yes, another language) which can define how HTML elements are rendered in your browser.
In this article I will not teach you every detail of CSS, but I want to show you some basics. Usually a beautiful design does not come from a programmer or HTML coder but from professional graphician. To make a great design you need a talent and much experience with graphical design. That is something that most programmers do not have (and that is OK, because we have talent to write a good code). Nevertheless you need to know how to apply some CSS styles to make your application look modern.
CSS Basics
CSS is a language for the definition of graphical properties for individual HTML elements – things like text color, text size, background color, position, etc. Each browser has a set of default CSS definitions for HTML elements (called user agent stylesheet), we can override these definitions by using our own.
Basically a CSS file looks like this:
body {
    font-family: Arial, Verdana, Helvetica, sans-serif;
    font-size: 12pt;
}
h1 {
    text-decoration: underline;
}
It contains a set of CSS selectors (body or h1 in this case) each of them containing a
set of CSS properties with
values in curly braces divided by semicolons. Most CSS properties and their values are self-explaining
and as you can see, these properties are also very specific. For example, you can set a different
color and style for each side of an element:
input {
    border-left-width: 3px;
    border-left-style: dotted;
    border-left-color: #FF0000;

    /* more compact syntax */
    border-bottom: 3px dashed #00FF00;
}
This code should produce something like this (an input with different border styles and colors):
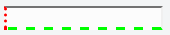
/* more compact syntax */ is a CSS multi-line comment.
There are no single-line comments in CSS.
You will soon notice, that a CSS file grows fast for complicated designs. The advantage of CSS is that you can define CSS styles for many HTML elements globally using those CSS selectors (read on).
The styles which you define for elements in the upper levels of the HTML structure are inherited by their descendants, unless these elements are told to be different. In case of conflict (you can set different values of the same attribute for an element), the right CSS definition is selected by cascading of styles. In short the cascading means that more specific selectors and definitions which are defined last are used in case of uncertainty. You can observe these conflicts using the DOM inspector in developer tools (F12) of your browser:
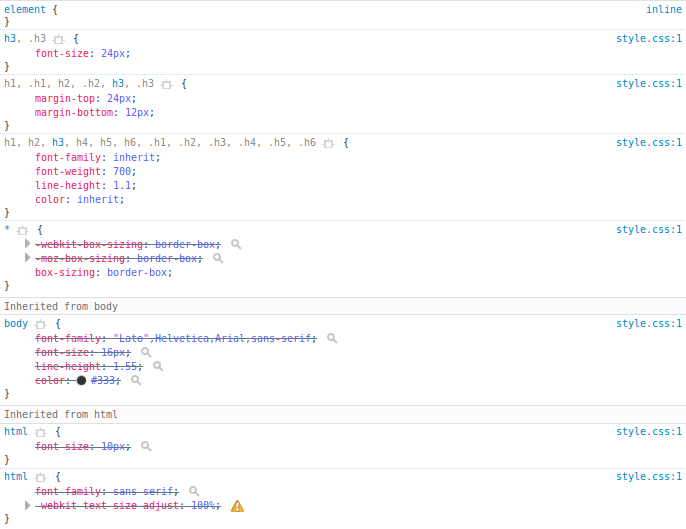
Strikeout property values are those which are overridden.
Linking your CSS to HTML file
To link the style definition to our page, we need to pass our CSS definitions into the browser. There are three ways how to do it, but the best is to place the CSS definitions into a separate file(s). This way, you can easily swap CSS files if you want to apply a new design. Notice in the developer console (F12) that after you link the HTML and CSS file together, a new HTTP request is sent by the browser to retrieve that CSS file.
<head>
    <link rel="stylesheet" href="link/to/your/css/file.css">
</head>
CSS Selectors
A selector is a powerful expression which can locate HTML elements in your page. Remind yourself that HTML is a tree-like structure:

In such a structure you can describe location of an element by saying that it has a certain sequence of parents, e.g.:
you can select the <a> element in the <footer> part of the page by typing the CSS selector footer p a. The spaces
between element names represent nesting deeper in the tree structure. You can also write just footer a, because
there is no other <a> element in the <footer> tag (other than the one in p) so there is no need to be so specific.
Selectors do not need to
list every level of the HTML structure when using spaces. The most basic and most general CSS selector is just the
name of a HTML element.
In some cases you might want to emphasize the parent-child relationship with > operator. That means that the element behind
this operator is a direct descendant of the element before the > operator. With the > operator you need to
write footer>p>a because footer>a would not work (the element a is not a direct descendant of footer).
Class selector
The CSS selectors in the paragraphs above are still very general. Sometimes you have multiple HTML elements, say those <li>
elements, and you want two of them to look different than the others. You can achieve this by using classes. A class
is just an identifier which you (or a HTML coder) fabricate and put in the class attribute of the desired element:
li {
    list-style-type: disc;
}
li.different-than-others {
    list-style-type: square;
}
<ul>
<li><a href="...">...</a></li>
<li><a href="...">...</a></li>
<li class="different-than-others"><a href="...">...</a></li>
<li class="different-than-others"><a href="...">...</a></li>
</ul>Notice that there is a difference between li.different-than-others and li .different-than-others. The first
one selects a <li> element with the class different-than-others and the latter selects any element
with the class different-than-others within a <li> element.
ID selector
Sometimes you may wish to be even more specific and select one particular HTML element. That element is
provided with an id attribute, which has to have a unique value among all other id attributes on the page.
In the CSS selector you simply use # with the id attribute value similarly to a class . selector:
#special {
    text-transform: uppercase;
}
<h1 id="special">This H1 is unique</h1>Attribute selectors
You can also select elements just by knowing certain HTML attribute values or their presence
on HTML elements. This is useful especially with forms because otherwise you have to pollute your HTML code
with unnecessary class attributes:
input[type=checkbox] {
    /* some CSS just for checkboxes */
}
input[required] {
    /* some CSS just for mandatory inputs */
}
Pseudo-classes
A pseudo-class is a special selector for features which cannot be easily recorded in the HTML code or
described with classes. Most popular one is :hover which is used to style
HTML elements while a mouse cursor is present over them (an interesting point is that some modern devices
do not have a mouse). You can use pseudo-classes also on parent elements:
/* applied for all a's in lists */
ul li a {
    text-decoration: none;
}
/* applied on all a's when mouse is over whole ul */
ul:hover li a {
    color: #FF0000;
}
/* applied when mouse is over particular a */
ul li a:hover {
    text-decoration: underline;
}
Some useful pseudo-classes:
:visited– visited link:checked– checked input, same asinput[checked]:valid– valid input:invalid– invalid input:nth-child(even)and:nth-child(odd)– even and odd elements
Combining CSS selectors
More CSS selectors can be combined with commas:
/* applied for all headers */
h1, h2, h3 {
}
/* applied for some form inputs */
textarea, input[type=text], input[type=number], select {
}
Task
Try to write a CSS selector to find all <a> tags, which are direct descendants of a <td> element in
the HTML structure presented in the figure above. Add another CSS selector for the same elements only when mouse
cursor is over one of them.
table td>a {
    /* some CSS definitions */
}
table td>a:hover {
    /* some CSS definitions which apply only when mouse cursor is over that element */
}
CSS properties
There are too many CSS properties to list here, you can find them in a great Cheat sheet or using Google just by typing what you want to achieve. As the HTML language evolves, CSS (currently in version 3) also expands the list of available properties. You can check current support of the different web technologies among internet browsers on http://caniuse.com/.
Task
Try to find and use CSS for rounded corners.
<!DOCTYPE html>
<html>
<head>
    <title>Round corners</title>
    <meta charset="utf-8">
    <style>
        h1 {
            border-radius: 5px;
            border: 1px solid #000000;
        }
    </style>
</head>
<body>
    <h1>I have rounded corners.</h1>
</body>
</html>
Colors
Colors are defined with their RGB components. Usually a HEX coding is used, but plain RGB is also available:
h1 {
    color: #FF0000;
    /* or */
    color: rgb(255,0,0);
}
The HEX coding makes it simple to mix colors because it gives you 16 levels of each basic color – e.g. if you want to mix a somewhat yellowish color you can take 12 levels (C - 12) of red and 10 levels (A - 10) of green which is encoded like this #CCAA00.
You can even shorten that HEX color entry by leaving out the repeating letters/numbers #CCAA00 -> #CA0.
Unit system
There are many CSS units to set sizes of different elements, most used ones are px, em, rem, pt and %. CSS units can be divided into absolute units (mm, cm, in, pt) and relative units (%, em, rem, vw, vh, vmin, vmax, ex, ch). The calculation of element’s size given by a relative unit is based on the size or some other characteristics of its parent. Elements with their size in absolute units render with the same size on any device. The pixel unit px is somewhere between because the size of a pixel can vary with screen resolution or pixel density.
Some useful relative units:
- % – relative to parent size (for height, the parent must have defined absolute height, otherwise the calculations would cause an infinite loop – height of the parent is based on the content height)
- em – size of parent font (you should set the
<body>font in pt to have at least top level font size given) - rem – size of root element (
<body>) font - vw, vh – percent of window width/height (v stands for viewport)
- vmin, vmax – percent of smaller/larger dimension of viewport
You can set width and height only for
block elements. Inline elements
can only change the size of font (line-height). To switch
this behavior, you can use the CSS property display with value block or inline. There is also a mode called
inline-block which enables inline elements to have specific width and height and not wrap lines at their ends.
Positioning
There are four types of element’s position modes. The default one
is static which places inline elements on
a single baseline as long as they fit width of the window and block elements on entire width of the window.
The position mode called Relative is used to displace an
element from its default (static) position. But it is mostly
used just as a container for the Absolute position mode.
The absolute mode is used to place the element on a certain position
within its parent. The parent is either the body element or the element with its position set to anything other than static.
The fixed position is used to place the element on a given position in the browser
window (even scrolling does not affect
the element position – navigation panels on some sites behave like this).
Task
Try to set relative and absolute positions and different sizes for some box elements (<div>s):
- Make a
<div>with size 3 × 3 cm. - Place this
<div>(using absolute positioning) into the bottom right corner of another one, which has 10cm height. - Explore the difference between absolute
<div>inside a relative and a static parent element. - Make a
<div>with the fixed position and place it in the bottom left corner. Make it 30% of the window size.
<!DOCTYPE html>
<html>
<head>
    <meta charset="UTF-8">
    <title>Relative and aboslute</title>
    <style>
        div {
            border: 1px solid #000000;
        }
        #relative-container {
            /*position: static;*/
            position: relative;
            border: 1px solid #00FF00;
            height: 10cm;
        }
        #absolute-size {
            position: absolute;
            right: 2cm;
            bottom: 2cm;
            width: 3cm;
            height: 3cm;
        }
        #relative-size {
            /*
                size in relative unit is relative to its parent size -
                therefore we need to set position property to fixed
                (parent of fixed element is browser's window) because
                relative height of this div to body element would cause
                infinite loop of resizing
            */
            position: fixed;
            bottom: 2cm;
            left: 2cm;
            width: 30%;
            height: 30%;
        }
    </style>
</head>
<body>
    <div id="relative-container">
		This one has 10cm height.
        <div id="absolute-size">
            This one is 3cm x 3cm in bottom right corner.
        </div>
    </div>
    <div id="relative-size">
        This one is 30% of window size and always in left bottom corner.
        <br />
        Try to resize window.
    </div>
</body>
</html>
Box-model and size
In CSS, you can set a different size for outer offset (margin), inner offset (padding) and border.
By default the margin, border and padding are not included in the width and height of an element. Therefore
to calculate how much space an element will occupy on the screen you have to sum all of these values for the top, left,
bottom and right side of an element plus the element’s width and height.

You can set different values for padding, margin and border at each side of the element. Remember that if
you want to save some time writing those long CSS property names, you can put all dimensions into one definition
in clock-wise order (top, right, bottom, left):
.some-element-with-padding-and-margin {
           /* T    R    B    L */
    padding: 10px 20px 30px 40px;
           /* top is 10px and rest is 20px */
    margin: 10px 20px;
}
Summary
In this chapter you have learned about CSS and why and how to use it. This article covers the basics, there is much more to know if you want to be a professional HTML coder (a person who converts graphical design into the HTML and CSS codes). The important thing is that you can understand the CSS syntax and know how to connect CSS with HTML. You should be able to find basic CSS properties online and be able to use them.
In the following chapter I will show you how to use some freely available CSS styles so that you can save a lot of work designing a full page from scratch.
New Concepts and Terms
- CSS
- CSS selector
- CSS properties
- CSS units
- CSS class
- CSS colors
Control question
- Where to put CSS files (separate CSS file,
<style>tag, inline)? - Should you use element names in CSS selectors or just class names?
- Is pixel (px) an absolute unit?