Database migrations
There is a problem with changes in the database structure when you work in a team and with multiple environments where your application is running (e.g. your development machine, other programmers’ development machines, testing server, production server…). When a developer makes a change in the database structure, this change has to be propagated to other databases used by all instances of one application.
Try to think in larger scale: an application installed on multiple machines, developed by many programmers during many months or even years and regularly updated/modified based on users’ requirements.
You can have a special discussion thread in your team’s communication tool (e.g. Slack)
or you can give a phone call to all other programmers and tell them concrete instructions to change their database
tables. A better way is to write SQL queries into a file and commit these files into Git. It is a good idea to use
current date as a name for such file, e.g. 2018-10-20_add-account-table.sql.
It definitely means that instead of clicking in a tool like Adminer or phpMyAdmin, you simply write a piece of SQL code which describes the database changes you want.
This is all very tedious and people tend to forget to propagate database changes or check for database changes periodically. Even the “SQL file with updates” approach is problematic as one has to copy&paste all SQL codes file by file when there are more changes or you are making a fresh install. Plus you do have to remember last SQL patch file you used. The answer to all these problems is: use migrations.
A database migration is a programmatic way to describe database changes. It is very similar to “SQL file with updates” approach but it is managed by a software tool and you do not have to remember last migration used and installing new database or updating existing structure is a matter of one single command in the console.
How does it work
In PHP word, a database migration is a simple PHP file where you can either use some kind of API to perform database
modifications or you can directly execute a SQL query. A database migration can also be used to define default data
(e.g. dials like contact_type or relation_type). Some database migration systems can also be used to undo changes.
The undo ability is useful when switching branches in Git. The migration tool remembers migrated files (usually
in a database table) and when you execute migrate command, only newly created migrations are executed. Similarly,
the rollback (undo) command finds last batch of migrations and reverts them from database structure.
Here is an example of database migration from Laravel framework based application:
<?php

use Illuminate\Support\Facades\Schema;
use Illuminate\Database\Schema\Blueprint;
use Illuminate\Database\Migrations\Migration;

class Persons extends Migration
{
    public function up()
    {
		Schema::create('person', function(Blueprint $table) {
			$table->increments('id');
            $table->string('nickname', 100);
            $table->string('first_name', 100);
            $table->string('last_name', 100);
            $table->integer('id_location')->unsigned()->nullable();
            $table->date('birth_day')->nullable();
            $table->integer('height')->unsigned()->nullable();
            $table->timestamps();

			$table->unique(['nickname', 'first_name', 'last_name']);
			$table->foreign('id_location')->references('id')->on('location')->onDelete('cascade');
		});
    }

    public function down()
    {
        Schema::drop('person');
    }
}
You can see that the up method creates a new table called person with all columns, their data-types and keys. It
even creates a foreign key to location table (that table has to be created beforehand in another migration file).
The down method is there to perform undo action – it simply drops the table here.
To execute the migration in Laravel based project, just type php artisan migrate to execute the up part or php
artisan migrate:rollback to execute the down part. You can create multiple migration scripts and they are executed
all at once (in a batch) when the migrate command is executed. File names of all migrated scripts are stored in
a database table with same timestamp. The rollback command may also executes multiple scripts as they were migrated
together – the timestamp in DB is the same. Database records about migrated scripts are deleted after rollback.
What happens when migration fails
Sometimes a migration fails during database structure changes. It may result in partial changes of database structure, it is sometimes needed to revert changes by hand or delete whole database and migrate everything from scratch after fixing the migration script. You should always test the migration script before committing them into Git. The rollback or undo command is unfortunately useless in this situation because the migration or rollback only works in batches.
This is actually the largest problem of programmatic migrations. You should be very careful when you design the migration because there can be side-effects especially with a database with real-world data. Always make a backup before executing migrations on production server!
Writing migrations using Phinx
The example presented above is specific for Laravel framework. I will use Phinx migration system
to present a small example of migrations usage on the course project. I will create a migration for account table
from Login walkthrough.
We have to download Phinx first using Composer.
composer require robmorgan/phinx
# OR when you have composer.phar file in your project root
php composer.phar require robmorgan/phinx
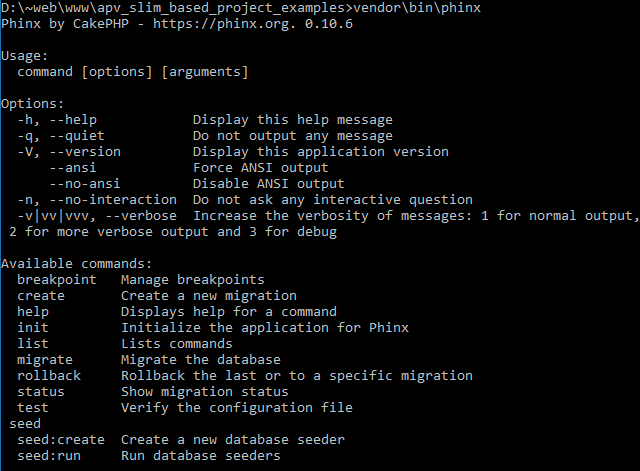
This command created a Phinx executable file in the vendor/bin subfolder of your project. There is a phinx.bat file
for Windows and phinx shell script for Linux. Type vendor\bin\phinx (Windows) or vendor/bin/phinx (Linux) to
execute Phinx from your project root. You should get similar output with Phinx usage description:
I will use Linux style commands from now on. Just change / to \ on Windows OS.
Phinx will need database credentials to access your database. We can use vendor/bin/phinx init . command to
initialize config and then open phinx.yml in your editor. The config file contains DB credentials for different
environments. This file unfortunately duplicates values from .env file and is static (you will have to commit
your database credentials into Git). I will therefore not use phinx.yml file to store database credentials.
I will rather create a dynamic Phinx config using phinx.php file – it will gather database credentials from
our settings in the src/settings.php file (which loads the .env file).
The phinx.php file (place in the root directory of your project):
<?php
require_once './vendor/autoload.php';
$settings = require './src/settings.php';
$config = $settings['settings']['db'];
return [
    'paths'                => [
        'migrations' => 'migrations', //migration folder - create manually
        'seeds'      => 'seeds',      //seeds folder - create manually
    ],
    'environments' => [
        'default_migration_table' => 'migrations',
        'default_database'        => 'development',
        'development'             => [
            'adapter'   => $config['dbtype'],
            'host'      => $config['dbhost'],
            'name'      => $config['dbname'],
            'user'      => $config['dbuser'],
            'pass'      => $config['dbpass'],
            'port'      => 5432,
            'charset'   => 'utf8',
            'collation' => 'utf8_unicode_ci',
            'prefix'    => '',
        ],
        'production'              => [
            'adapter'   => $config['dbtype'],
            'host'      => $config['dbhost'],
            'name'      => $config['dbname'],
            'user'      => $config['dbuser'],
            'pass'      => $config['dbpass'],
            'port'      => 5432,
            'charset'   => 'utf8',
            'collation' => 'utf8_unicode_ci',
            'prefix'    => '',
        ],
    ],
];
Before creating your first migration, you have to create the migrations folder – just type mkdir migrations or
use your file manager to create this directory. To create a migration use following command:
vendor/bin/phinx create Account
This should create a file named like 20181114092000_account.php in migrations folder. You will find a method called
change in this file. You should specify the modifications you want to make in your database. Take a look at
Phinx table documentation and
Phinx column documentation to understand the API
and see allowed column types. Our migration can look like this:
<?php

use Phinx\Migration\AbstractMigration;

class Account extends AbstractMigration
{
    public function change()
    {
        $table = $this->table(
            'account',                                          //table name
            ['id' => false, 'primary_key' => ['id_account']]    //specify primary key
        );
        $table->addColumn('id_account', 'integer', ['identity' => true])    //set auto-increment
            ->addColumn('login', 'string', ['limit' => 100])
            ->addColumn('password', 'string', ['limit' => 255])
            ->addIndex(['login'], ['unique' => true])
            ->create();
    }
}
Maybe you noticed that Phinx migration does not contain up() method for forward migration and down() methods for
rollback by default. The change() method is used to define reversible migrations – the system can figure out the
rollback steps if you obey specific rules.
You can specify custom up() and down() methods. Using the change() method is preferred though, but you cannot
use direct SQL code.
Finally, we can migrate the database changes described in migrations folder by using this command:
vendor/bin/phinx migrate
There should be a new database table called account with three columns:
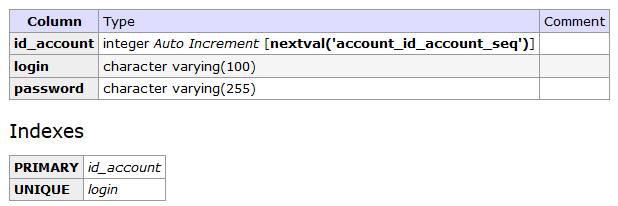
Check out the migrations table to see migrations log. To undo or rollback the migration use
vendor/bin/phinx rollback command.

You might have noticed, that there are multiple environments in the phinx.php or phinx.yml file. To use settings
for production environment (or any other environment) use -e switch, e.g.: vendor/bin/phinx migrate -e production.
We do not need to differentiate between environments in our case (note that the values used in phinx.php are same),
because we have different .env file for each instance of the application.
Database seeding
Seeding is similar to migrations but it focuses on data, not on database structure. Sometimes you need to install your application with some predefined data in particular tables (e.g. dials for relation and contact type). Or perhaps you want to setup some default user into the account table, create the seeding file first:
# remember to create the directory first
mkdir seeds
# create the seeder file
vendor/bin/phinx seed:create Admin
Specify seeding procedure:
<?php

use Phinx\Seed\AbstractSeed;

class Admin extends AbstractSeed
{
    public function run()
    {
        $data = [
            [
                'login'    => 'admin',
                'password' => password_hash('pass', PASSWORD_DEFAULT)
            ]
        ];

        $table = $this->table('account');
        $table->insert($data)->save();
    }
}
Run the seeder: vendor/bin/phinx seed:run. The result should look like this (the password hash will differ).

You can use seeding only to setup development/testing environment and default values for dials can be inserted using standard migrations.
Summary
It does not matter whether you use Phinx or other migration tool. The ides behind and workflow is very similar.
The benefit of using database migrations is that the process can also be automated. You can create a simple bash script
for each fresh install or database update and this script can be executed when you pull new code from main Git
repository using hooks (use post-merge hook).
Migrations are also very useful for Docker because you do not want to setup the database by hand each time you reset the container. Docker container can also execute migration script on start automatically.
New Concepts and Terms
- Database migrations
- Database seeding